
The building department may tell you that you don’t need to hire a licensed surveyor—you can draw the site plan yourself. But that often leads to a bigger question: how exactly do you draw a site plan correctly?
If you need a permit-ready drawing instead of a DIY explanation, you can get a permit-ready site plan in 24 hours from My Site Plan.
Creating a site plan is a critical step in any construction, renovation, or landscaping project. Whether you're tackling a DIY improvement or preparing documents for permit approval, your site plan needs to clearly show property boundaries, structures, and key features. In this guide, you’ll learn how to draw a site plan properly so your project starts on solid ground and moves forward without costly delays.
Draw it yourself vs. Let MySitePlan handle it
DIY Site Plan |
My Site Plan |
Measure property manually |
Fast online ordering |
Learn permit requirements |
Permit-ready plans |
Time consuming revisions |
Delivered quickly |
Risk of mistakes |
Accepted nationwide |
Multiple software/tools needed |
Starting at $99+ |
MySitePlan creates fast, affordable site plans for permits, pools, fences, additions, and construction projects.
Need this done for you? Order a professional site plan online from My Site Plan and get a permit-ready drawing delivered in 24 hours.
Who Can Draw a Site Plan?
Anyone can draw a site plan
Local regulations may vary
Acceptable for submission if requirements are met
DIY homeowner and contractor options
Some choose professional service for accuracy/peace of mind
Creating a site plan is essential for construction/landscaping
Guide purpose: create detailed site plan for DIY/professional projects
What Skills Do You Need to Draw a Site Plan?
You don’t need to be an architect or a drafting whiz to create a proper site plan—but a few basics will help tremendously. For starters, it’s useful to be comfortable reading and following property boundaries, and to understand how to measure distances accurately with a tape measure or laser tool. Familiarity with simple geometry goes a long way, as you’ll need to create shapes and scale them to match real-world dimensions.
If you’re tackling your site plan digitally, a willingness to explore user-friendly tools like SitePlanCreator, Cedreo, or even basic drawing apps can make the process smoother. Pen-and-paper folks should feel confident using graph paper and a ruler to keep everything neat and proportional. Ultimately, patience and attention to detail matter most—clear, accurate depictions of fences, trees, driveways, and structures will simplify your permit process and keep your project moving forward.
Table of content
To draw a site plan, measure your property, sketch the lot lines to scale, then add existing structures, driveways, and utilities. Mark key distances like setbacks and easements, label dimensions clearly, and include a north arrow, scale, and legend so the plan is easy to review for permits or project planning.
Introduction to Drawing Site Plans for Permits
A site plan is a drawing of a property, showing all the current and planned buildings, landscaping, and utilities. A view from above, like a bird's view, shows how the different parts of the property relate to its boundaries. In construction, landscaping, and during the permit application process, a well-drawn site plan is invaluable.
Before putting pencil to paper (or mouse to screen), it’s important to know exactly what your local building department expects from a site plan. Start by reviewing your city or county’s permit checklist—these usually outline what information your drawing must include, such as setbacks, lot lines, existing structures, and proposed changes.
If you’re not sure about certain requirements or how strictly zoning codes will be enforced, give your local planning department a call or check their website. Many municipalities provide sample site plans or downloadable guidelines to help you stay compliant.
Getting clear on these details early saves headaches later and boosts your chances of a smooth permit review process.
We create a plan to guide future actions, anticipate potential changes, and ensure compliance with zoning laws and regulations. This article outlines the steps we will take, identifies any potential modifications, and ensures we adhere to legal requirements.
Ensuring Your Site Plan Meets Local Requirements
Before putting pencil to paper (or mouse to screen), it’s important to know exactly what your local building department expects from a site plan. Start by reviewing your city or county’s permit checklist—these usually outline what information your drawing must include, such as setbacks, lot lines, existing structures, and proposed changes.
If you’re not sure about certain requirements or how strictly zoning codes will be enforced, give your local planning department a call or check their website. Many municipalities provide sample site plans or downloadable guidelines to help you stay compliant.
Getting clear on these details early saves headaches later and boosts your chances of a smooth permit review process.
Preparation for Drawing a Site Plan
Before starting the drawing, understand the site plan's purpose and gather the required materials. Will it be for personal reference, or do you need to submit it for a permit? Determining this early on will influence the level of precision and detail required.
To begin, get your workspace ready. Collect the necessary tools such as pencils, ruler, eraser, and graph paper if you plan on doing manual drawings. Alternatively, if you prefer using software, make sure you have access to a computer.
Obtaining Property Line Information
Identifying accurate property lines is critical to creating an accurate site plan. Modern technology provides online GIS platforms to easily find property lines. This section would walk you through how to access these platforms and interpret the data they provide. For those without access to GIS, we'll discuss alternative methods to find this critical information.
Accessing Geographic Information System (GIS) Platforms

To find GIS data for your property, go to your local government's website. Many local governments provide GIS resources online that are free to the public. Here's a step-by-step process to help you navigate this resource:
- Locate the official website for your local city or county planning department or assessor's office.
- Look for a section dedicated to GIS, maps, or property information.
- To use the GIS tool, you may need to enter specific information. This could include your address, parcel number, or the name of the property owner.
- After choosing your property, the GIS platform will show a detailed map with property lines, nearby roads, and other features.
- Use GIS tools to explore various data layers like topography, zoning, and utility lines.
- Many GIS platforms allow you to print or save a copy of the map, which can be useful for your site plan creation.
Choosing the Right Tools and Software
With technology at our fingertips, several software options make site plan creation straightforward. We will explore tools like AutoCAD, SketchUp, and Adobe Illustrator, and compare them with traditional drawing methods. For those opting for manual drawing, we'll share techniques for using graph paper effectively.
AutoCAD (Most difficult to learn)
AutoCAD is a professional-grade design software that offers precision and a wide array of features. Its tools allow users to create complex and detailed designs suited for large projects. AutoCAD is especially beneficial for professionals who require advanced capabilities in site modeling. While this is the most comprehensive solution, it's also has the longest learning curve. Not ideal for homeowners or amateurs.
We've created a video to walk you through the steps.
SitePlanCreator (Fastest Path to a Permit-Ready Site Plan)
Best for: Homeowners and contractors who want most of the heavy lifting done automatically
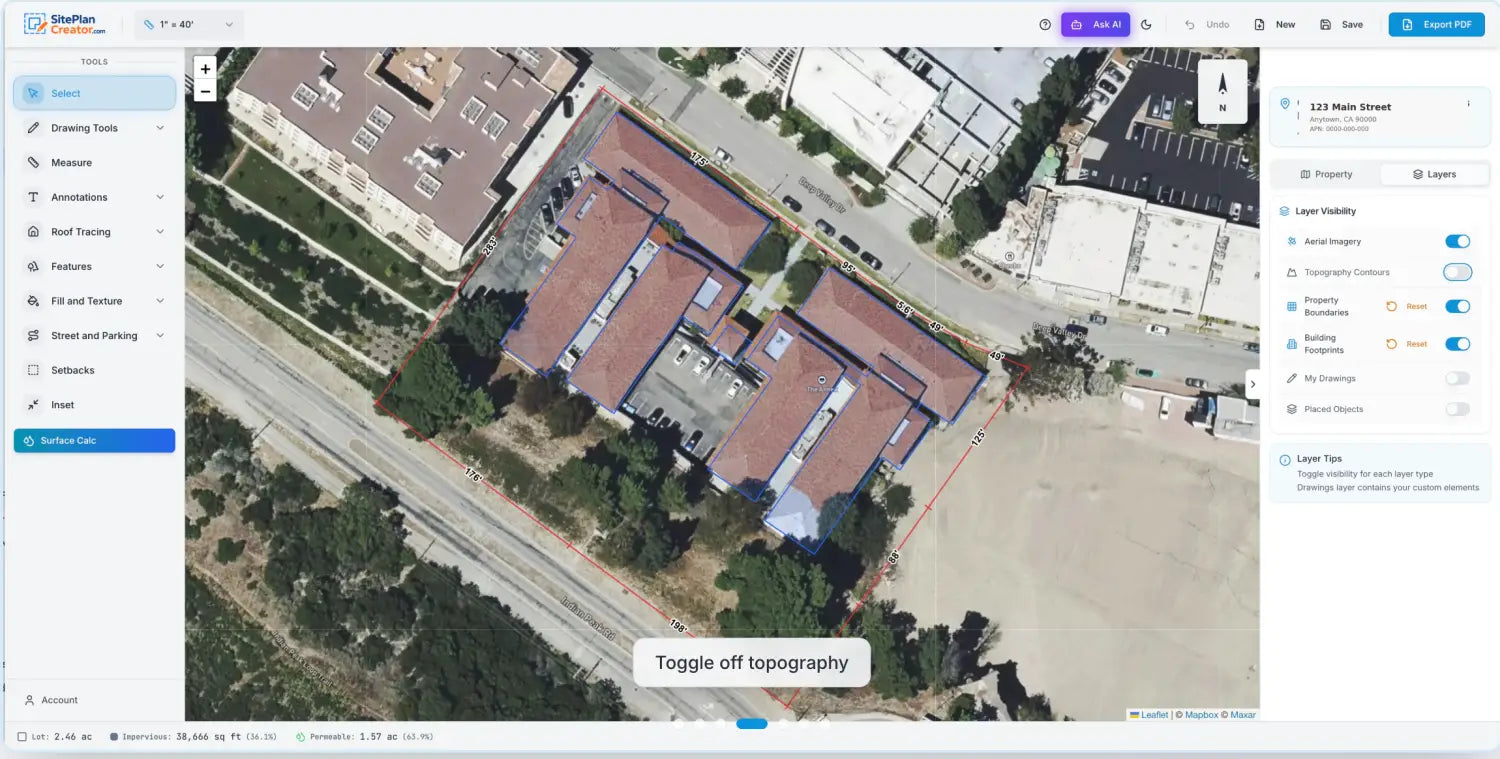
SitePlanCreator is a web-based tool built specifically for creating clean, scaled site plans for permit submission. When you enter your address, the system loads your parcel boundaries, sets the drawing scale, places a north arrow, and displays existing structures in a properly scaled environment. Instead of starting from a blank canvas, you begin with a structured foundation.
From there, the user typically only needs to add a few remaining elements such as driveways, patios, trees, fences, or a proposed structure. Dimensions, labels, and common site plan elements can be added quickly, and the plan can be exported as a clean PDF ready for submission.
Why we like it: It removes the technical setup and scaling steps that make traditional software intimidating. Most of the framework is already in place, so the user focuses only on project-specific details rather than drafting from scratch.
Cost: Plans start at $39 for DIY creation, with optional done-for-you services available for users who prefer a fully managed setup.
If your priority is speed, simplicity, and permit clarity rather than advanced 3D modeling, this approach keeps the process efficient and practical.
Cedreo (Great if you have all of your own property measurements)
Best for: Creating quick and effective site plans
Cedreo is a web-based design software primarily tailored for DIY homeowners, home builders and real estate professionals, offering powerful tools to quickly create detailed site plans. The platform allows users to design both 2D and 3D site plans efficiently, which are essential for project approvals and client presentations.
Cedreo simplifies the process of site planning with intuitive drawing tools and a user-friendly interface that speeds up the creation of accurate floor plans and elevations. Its capability to generate photorealistic 3D renderings helps clients visualize how a site will look once construction is complete, aiding in faster decision-making and approval processes.
Why we like it: Cedreo is particularly valued for its efficiency, enabling users to draft complete site plans in a significantly shorter time frame compared to traditional CAD software. This makes it an excellent choice for professionals who need to meet tight deadlines without sacrificing the quality or detail of their site plans.
Cost: While Cedreo offers a free version with limited features, their premium plans start at $79 per month, which include more comprehensive tools and capabilities, such as unlimited projects and high-quality rendering options, making it a cost-effective solution for regular use.

SketchUp
SketchUp is easy to use and popular with both DIY homeowners and professionals because of its user-friendly interface. It provides a 3D modeling system that can help visualize the layout in a more realistic manner. SketchUp has an extensive collection of models made by users, which can help you add intricate details to your site plan.

Manual Site Plan Drawing
If you like drawing with your hands or don't have digital drawing tools, you can still draw manually. To start a manual site plan, you'll need a few basic tools:
- Graph paper: to keep your drawing to scale. Templates below.
- Pencils: for sketching, with a good eraser to correct any mistakes
- Ruler or a scale: for straight lines and to measure distances
- Compass: for drawing circles or arcs
- Protractor: for measuring and laying out angles
- Triangle: for additional precision in creating angles
When choosing your drawing tools, prioritize quality to ensure precision. For instance, mechanical pencils with fine leads are excellent for clean, sharp lines.
Select graph paper with a grid size that will comfortably fit the entire site while allowing you to work in enough detail. The traditional process involves starting with a rough sketch and then refining it into a more precise drawing.
To ensure accuracy and proportion, begin by setting a scale. For example, you can use a scale of 1 inch on paper to represent 10 feet on the property. This will help you maintain the correct measurements in your drawing.
Printable Site Plan Templates
We've created a horizontal and vertical PDF site plan templates that can be printed on 11"X17" paper. The PDF's include grids that can be used for scaling. There are 100 grid squares across so if your property is under 100' long then you can use each grid square as representing one foot. If over 100' then you can count each square as 2, 3, 4 or more feet per square. To decide which of the below site plan templates will work for you you will need to understand the North orientation of your property.
How Much Does It Cost to Have a Site Plan Drawn?
The cost of having a site plan drawn can vary quite a bit, with prices typically landing anywhere between $90 and $1,200. Where your project falls within this range depends largely on how you decide to get the plan created.
- Online site plan services: These are generally the most affordable route, especially if you have a straightforward property and can supply your own measurements. Expect to pay at the lower end of the spectrum.
- Design professionals: Working with an architect or draftsman may cost more—especially if your plan needs to meet complex zoning codes or design standards.
- Licensed land surveyors: If you need an official, stamped document for permitting, legal, or lending purposes, hiring a surveyor is the priciest option. Their fees reflect the professional equipment and expertise involved, as well as any challenging property features like steep terrain or irregular boundaries.
Other factors that can influence the price include property size, level of detail required, and how quickly you need the plan. Custom requests, rush jobs, or properties with unique challenges (like waterfront land or historic lots) can bump the price higher. If you’re on a tight budget, it never hurts to request quotes from a few local professionals or online providers—you might be surprised by the range.
Conducting On-the-Ground Measurements
Your site plan is only as accurate as your measurements. This section will delve into the methods for measuring your property, outlining the tools you need, such as a tape measure or laser measure. We'll also provide professional tips for ensuring your measurements are precise.
Methods for Measuring Your Property
Accurate measurements are the foundation of a reliable site plan. To ensure accuracy, there are a variety of tools and methods that can be used:
- Tape Measure: A tool for measuring short distances, like the length of a house wall or the space between landscape features.
- Laser Measure: A modern tool for accurate readings in far or tricky places, requiring less physical effort.
- Wheel Measure: Also known as a "measuring wheel," this tool is excellent for larger properties. Simply walk the wheel along the perimeter, and it will record the total distance.
- GPS Devices can capture boundaries on large or undeveloped land by giving precise geographical coordinates.
Drawing Detailed Site Plans
Now let's get into the details of how to draw a site plan.
We will show you how to put the measurements, property lines, and direction onto paper or software. We will discuss including buildings, driveways, and other features in your site plan. Additionally, we will provide advice on how to make it clear and helpful.
- Establish the Drawing Scale: Choose a scale that will comfortably fit on your chosen medium (paper or digital format) and allow room for detail. Common scales include 1 inch to 10 feet or 1:100 meters.
- Outline the Property Boundaries: Begin by drawing the property lines based on your measurements. Ensure the angles and lengths match the data you've collected.
- Add Existing Structures: Plot out the location of all buildings, ensuring they are to scale and properly positioned in relation to the property boundaries.
- Mark Driveways and Walkways: Indicate the paths for vehicles and pedestrians, which may affect the flow and design of your land use.
- Draw Landscape Features: Include trees, gardens, and terrain changes such as slopes or water bodies. These features can impact the usability and aesthetics of the site.
- Position Utilities: If required, locate the existing utility lines for water, electricity, gas, and sewage.
- Include North Arrow and Legend: A north arrow will assist in orienting the site plan while a legend explains the symbols and line types used in your drawing.
- Review and Adjust: Go over the plan to ensure all elements are included, accurately scaled, and clearly marked. Make adjustments as necessary for clarity.
- Finalize and Present: Clean up any stray marks or unclear lines. Your site plan should now be ready to share with stakeholders, serve as a blueprint for contractors, or submit for permits.
While mastering the art of drawing a site plan is invaluable for any construction or landscaping project, it demands time, precision, and expertise. If you're pressed for time or prefer to focus on other aspects of your project, consider delegating this task to the experts. At My Site Plan, we specialize in creating detailed, site plans tailored to your specific needs, guaranteeing acceptance and saving you the hassle. Entrust us with your site plan requirements and shift your valuable focus back to where it's needed most. Visit us today to learn how we can assist in bringing your project to fruition with professionalism and ease.
Frequently Asked Questions (FAQ's)
Question Answer
| What is the purpose of a site plan? | A site plan shows all existing/proposed elements of a property for construction projects, ensuring compliance with local regulations, while also ensuring that the project scope approved at the building department matches the work onsite. |
| How accurate do my property line measurements need to be on a site plan? | Measurements must be accurate to ensure compliance. Use professional tools or services for precision. Pay particular attention to the area where the work is being performed. |
| Can I create a site plan myself, or do I need to hire a professional? | You can draw a basic site plan yourself for simpler projects; complex projects may require a professional for accuracy and compliance. It's always best to ask the building department first. |
| What common mistakes should I avoid when creating a site plan? | Avoid inaccuracies, omitting details, and non-compliance with zoning/building codes. Account for environmental, drainage, and safety. |
| Why might a site plan be rejected by local authorities? | Rejection reasons include non-compliance with zoning laws, inaccuracies, scale, paper size, overlooking environmental regulations, and safety concerns. |
| What tools can I use to create a digital site plan? | Use software like AutoCAD, SketchUp, and Adobe Illustrator for precision and flexibility, depending on project needs and software familiarity. Graph paper is another option. |
| How do I represent elevation changes in my site plan? | Represent elevation changes with contour lines, shading, or 3D modeling in digital software to assess construction and drainage impact. |
| How detailed should my utilities layout be? | If required, detail all existing and proposed utility lines precisely, including water, sewer, electricity, and gas, to avoid conflicts and ensure safety. |
| What resources are recommended for learning more about site plan creation? | Consider architectural textbooks, online tutorials, software guides, and community college courses for foundational knowledge and techniques. |
| How can I update my site plan if changes occur during construction? | Keep a digital version for easy updates. Regularly update for any changes, consulting with your team and reviewing local regulations. |
How Poor Site Plans Can Delay Your Project
Submitting a site plan that is unclear or inaccurate often signals trouble ahead, particularly when dealing with local permitting offices. If your plan is missing critical details or doesn’t align with actual measurements, review staff may send it back for revisions—sometimes more than once. Each round of corrections stretches out your timeline and can even push your project start date back by weeks or months.
Not only can these hiccups frustrate you, but if you’re working with contractors or have set delivery dates, scheduling conflicts (and costly delays) can quickly snowball. In some municipalities, officials may reject incomplete plans outright, forcing you to start over.
In short, investing the time to create a detailed and precise site plan up front is always worth it when you consider the lost time, added expense, and extra headaches poor planning can cause. Let’s make sure your plan sails through permitting on the first try.
Step-by-Step Instructions for Drawing Your Site Plan
Submitting a site plan that is unclear or inaccurate often signals trouble ahead, particularly when dealing with local permitting offices. If your plan is missing critical details or doesn’t align with actual measurements, review staff may send it back for revisions—sometimes more than once. Each round of corrections stretches out your timeline and can even push your project start date back by weeks or months.
Not only can these hiccups frustrate you, but if you’re working with contractors or have set delivery dates, scheduling conflicts (and costly delays) can quickly snowball. In some municipalities, officials may reject incomplete plans outright, forcing you to start over.
In short, investing the time to create a detailed and precise site plan up front is always worth it when you consider the lost time, added expense, and extra headaches poor planning can cause. Let’s make sure your plan sails through permitting on the first try.
Recommended Resources for Learning Site Plan Creation
SketchUp If you're looking to build your knowledge of site plan creation, several resources can help you get started or refine your skills:
- Architectural textbooks: These provide essential principles and best practices, covering everything from basics to more advanced techniques.
- Online tutorials and courses: Websites like Coursera, Udemy, and YouTube have step-by-step guides and video tutorials that can be invaluable, especially for learning how to use drafting software.
- Software guides: Manuals and official user guides for programs such as AutoCAD, and Adobe Illustrator offer detailed instructions for creating professional site plans digitally.
- Community college classes: Local colleges frequently offer beginner and intermediate courses in drafting and site planning, providing hands-on instruction.
Leaning on these resources can help ensure your plans are both accurate and compliant, whether you're tackling your first project or seeking to improve your technical know-how.
Where can I find additional references and resources for site plan creation?
For those looking to dive deeper or verify details when preparing a site plan, there are a variety of reliable resources available:
- County Assessor Parcel Viewers: Many county assessor websites provide online parcel maps, property boundary data, and public records. These can be invaluable for confirming lot lines or locating key property features.
- Local Government and City Planning Departments: Most municipalities maintain public records, zoning maps, and planning documents on their official websites. This is a good starting point for region-specific requirements or downloadable forms.
- GIS Mapping Portals: State or municipal GIS (Geographic Information Systems) hubs offer detailed layers—including topography, utilities, and land use—which are helpful for crafting accurate, comprehensive plans.
- Online Mapping Tools: Platforms like Google Earth supply aerial imagery and measurement tools that can assist with site orientation and preliminary layouts.
- How-To Guides and Tutorials: Many city government and planning websites feature step-by-step instructions or example drawings tailored to permit applications.
When in doubt, always cross-reference information from multiple reputable sources—and don’t hesitate to consult your local planning office if you need guidance tailored to your specific jurisdiction.
FAQs
"What common mistakes should I avoid when creating a site plan?
Avoid inaccuracies, omitting details, and non-compliance with zoning/building codes. Account for environmental, drainage, and safety.
Why might a site plan be rejected by local authorities?
Rejection reasons include non-compliance with zoning laws, inaccuracies, scale, paper size, overlooking environmental regulations, and safety concerns.
What tools can I use to create a digital site plan?
Use software like AutoCAD, SketchUp, and Adobe Illustrator for precision and flexibility, depending on project needs and software familiarity. Graph paper is another option.
"How do I represent elevation changes in my site plan?
Represent elevation changes with contour lines, shading, or 3D modeling in digital software to assess construction and drainage impact.
How detailed should my utilities layout be?
If required, detail all existing and proposed utility lines precisely, including water, sewer, electricity, and gas, to avoid conflicts and ensure safety.
What resources are recommended for learning more about site plan creation?
Consider architectural textbooks, online tutorials, software guides, and community college courses for foundational knowledge and techniques.
How can I update my site plan if changes occur during construction?
Keep a digital version for easy updates. Regularly update for any changes, consulting with your team and reviewing local regulations.
Do I need a survey to draw a site plan?
In many cases, a property survey is highly recommended because it provides accurate boundary lines and measurements. Some municipalities require a recent survey for permit approval, especially for additions or new construction. If you don’t have one, you may be able to reference your property deed or county GIS records, but accuracy is critical to avoid permit delays.
What scale should I use?
Most residential site plans are drawn at a scale of 1" = 20' or 1" = 30', depending on lot size. The goal is to fit the entire property clearly on one page while maintaining readable detail. Always check your local building department requirements, as they may specify a required drawing scale for permit submissions.
Can I draw a site plan myself for permits?
Yes, homeowners can often draw their own site plans for basic projects like fences, driveways, or small additions. However, the drawing must be accurate, to scale, and include all required details such as setbacks, structures, and dimensions. For complex projects or strict jurisdictions, hiring a professional site plan service can help ensure faster approval and fewer revisions.
If there’s anything else you want to know about ordering a plot plan online versus hiring a surveyor, check out MySitePlan’s FAQ page or contact us today.
This post was originally published on 2019-05-06. It was updated by Ryan Crownholm on 2026-02-14 to reflect new information and current prices.
About the author

Ryan Crownholm
Ryan is a construction technology founder and former contractor with 15 years of hands on experience in residential and commercial construction. He has been creating site plans for more than 25 years, supporting tens of thousands of homeowners and contractors across the United States. As the founder of MySitePlan.com, his work is grounded in real world permitting requirements, plan review feedback, and practical compliance standards used by local building departments.
